


Today, I’m sharing everything I know about achieving a light and airy photography style. You know those soft, light-filled photos you see on my portfolio? That’s light and airy, and this guide can help you achieve that look! We’ll dive into the goals of light and airy photography, discuss essential choices you need to make before shooting, explore camera settings, editing tips, and I’ll even recommend some fantastic light and airy presets. Let’s get started!
Why light and airy photography?
I didn’t set out to become a “light and airy photographer.” I’m still not always sure it’s exactly what I’d call myself, but if I had to categorize myself into a popular photography style, that would be it. Even though we’re in Oregon now, I’ll always be a Californian at heart. I love sunshine, light filtering through leafy oak trees, and warm sunset glows. As you look through my portfolio, you’ll probably get a sense of warm summer evenings and the airiness of wide open spaces. My editing style reflects that natural, outdoor heart in my photos and so: light and airy photos it is!
Goals of light and airy photography:
- soft: as in a gentle fade from light to dark, without heavy contrast
- warm: like a pleasant summer day, light an airy images are warm without being overly orange. I veer just on the warm side of neutral.
- light-filled: there isn’t much true black in the images, and shadows are light. There’s no feeling of heaviness or moodiness.
- simple and curated: Think clean, minimal backgrounds, clothing, and colors. Light and airy photography is often edited down to include only what is essential in the frame to put the emphasis on quiet details and emotion.
How to Get Light and Airy Photography
Prioritize Soft, Lighter Colors in Background and Wardrobe Choices
The background plays a crucial role in light and airy photography. Select locations with softer color palettes. For example, if your background includes a building, opt for one with light-colored cement walls instead of heavy red brick walls. Outdoors, look for willow trees with light filtering through their branches rather than dark evergreen forests. These choices create a gentle backdrop that won’t visually weigh down or overpower the photo with bold, heavy colors.
Speaking of choosing softer colors, encourage your clients to select softer colors like pastels or light neutrals. These hues complement the light and airy aesthetic beautifully. Avoid bold or vibrant colors that may distract from the softness and dreaminess of the overall look or feel too “busy”. By coordinating the wardrobe with the desired style, you ensure that every element of the image aligns harmoniously.
Shoot at a Wider Aperture
A wide aperture, like f/1.4 rather than f/5.6, will blur out more of the image, creating a smaller sliver of what’s in-focus. This gives images a dreamy feel, and to me mimics a memory. This isn’t to say all of my images are photographed with as wide an aperture as my lens can use. Often, I’ll want a portrait of everyone looking at the camera, and if I want everyone’s eyes to be in focus in it, I’ll need to use a smaller aperture which will increase the depth of what’s in focus.
Simplify Your Images by Creating Compression
Compression is a way of talking about the separation between your subject and the background. When you see a background with a lot of creamy bokeh or blur in the background and the subject is in crisp focus, that can be due to lens compression. In light and airy photography, it’s another way of creating that soft, dream-like aesthetic with a soft-focus background. There are a few ways to achieve this—the first is using a wider aperture. But as I mentioned in the last step, that might not always be possible. Here are a few other ways to increase compression.
- Use a longer lens: A longer lens means a lens with a bigger focal length, and it has more compression than a wider angle lens. This means if you take the exact same photo with the exact same camera settings except the first is shot with a 135mm lens and the second is shot with a 50mm lens, not only will your subject look “closer” but the background will be more blurred. My favorites are the 85mm and the 135mm, but it will vary depending on where and what you’re photographing.
- Pull your subject away from the background: This is another trick to increase compression. If you want to blur your background and create softness, pull your subject closer you you and farther away from the background. The background will soften, keeping the focus on your subject.
Prioritize Good Lighting
The most important thing in photography is the light, and in light and airy photography, you’ll want to prioritize light-filled locations. When scouting for locations, prioritize those with plenty of natural light. Look for spaces where the sunlight gently filters through trees or buildings, creating a soft and diffused glow. Diffused backlighting is my favorite, as it adds a touch of magic “glow.”
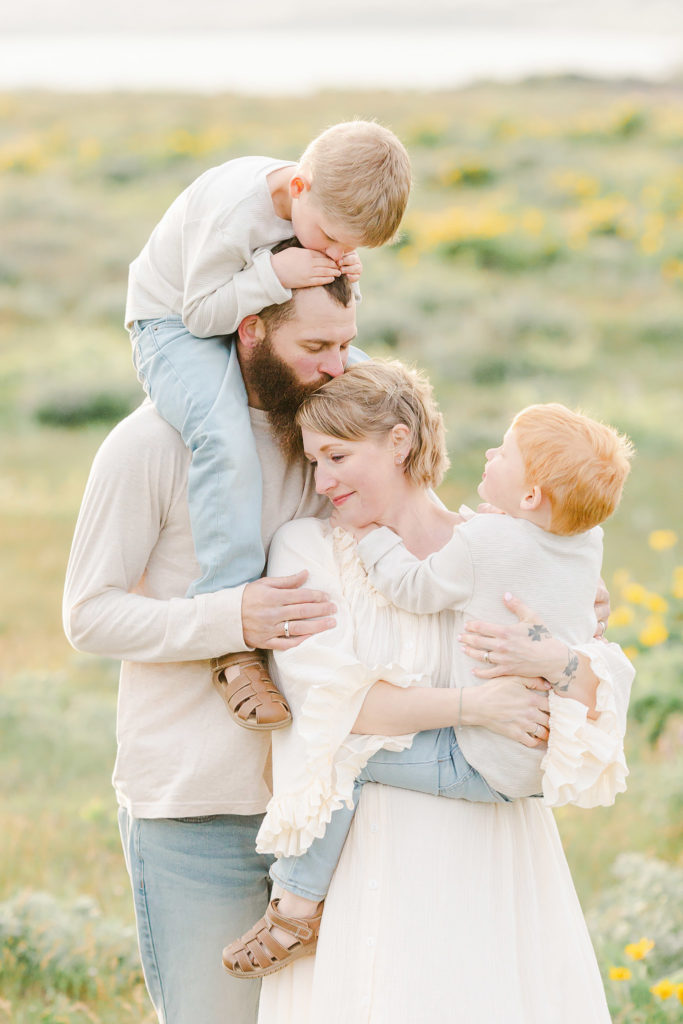
Embrace Open Spaces
To ensure your subjects are well-lit, make sure they are facing plenty of open space. This allows ample light to reach their faces and balances out the backlight. Open spaces create a sense of airiness and contribute to the overall light and dreamy atmosphere of your photos. Encourage your subjects to interact naturally within these spaces, capturing candid moments of joy and connection.

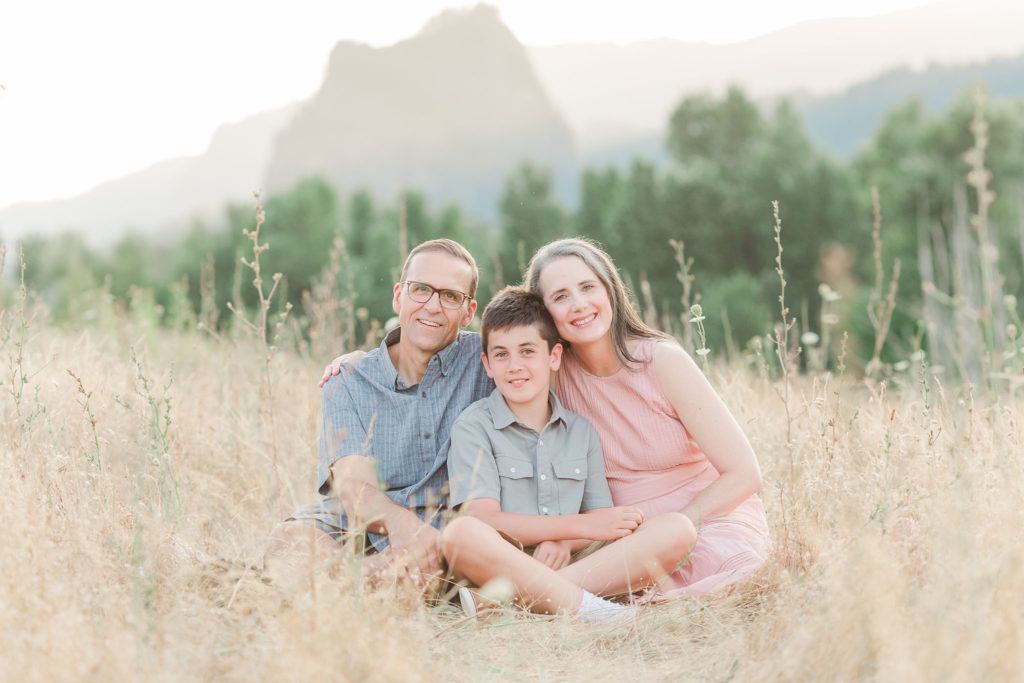
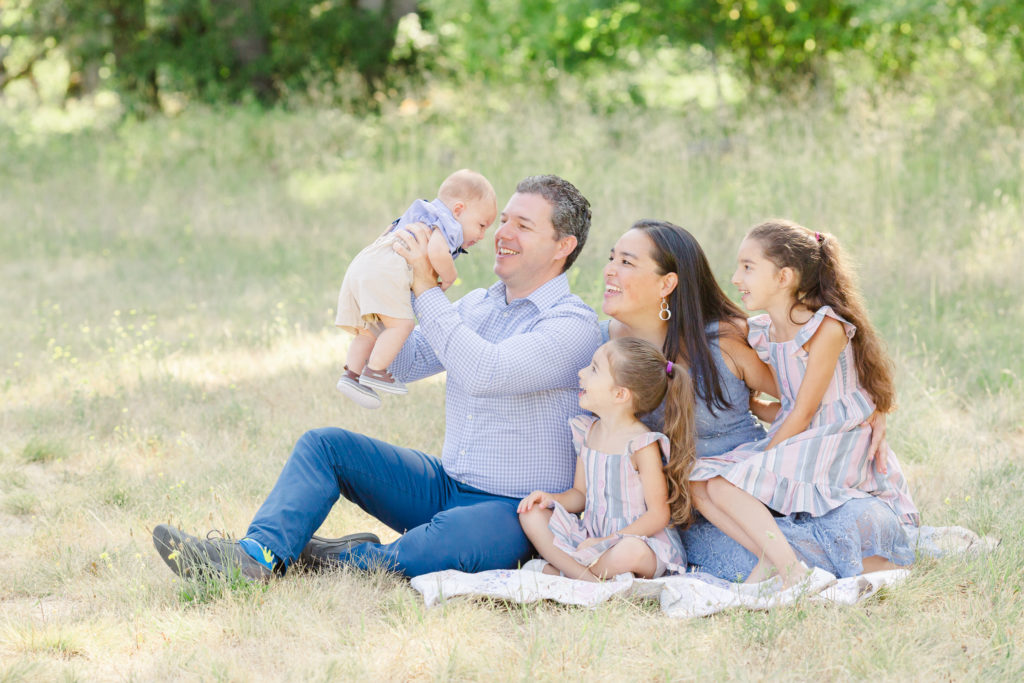
In this photo, several intentional elements of light and airy photography come together. The family is styled in light neutral colors with soft textures. It’s photographed with a 135mm lens at f/2.8. The background has soft colors, and the subjects are facing plenty of open space behind me, allowing their faces to be well-lit.
Camera Settings for Light and Airy Photos
While every situation calls for different camera settings, in light and airy photography you’ll want to start with a wider aperture between f/1.8 to f/2.5. Adjust your ISO to be as low as possible to avoid grain, and then adjust your shutter speed to be fast enough to avoid camera shake and capture your subject’s movement in the way you want to. I usually start with a shutter speed no slower than 1/200, but often adjust it to be faster if it’s a bright day and I need to let in less light or if my subject is a fast-moving kiddo and I want to freeze the motion.
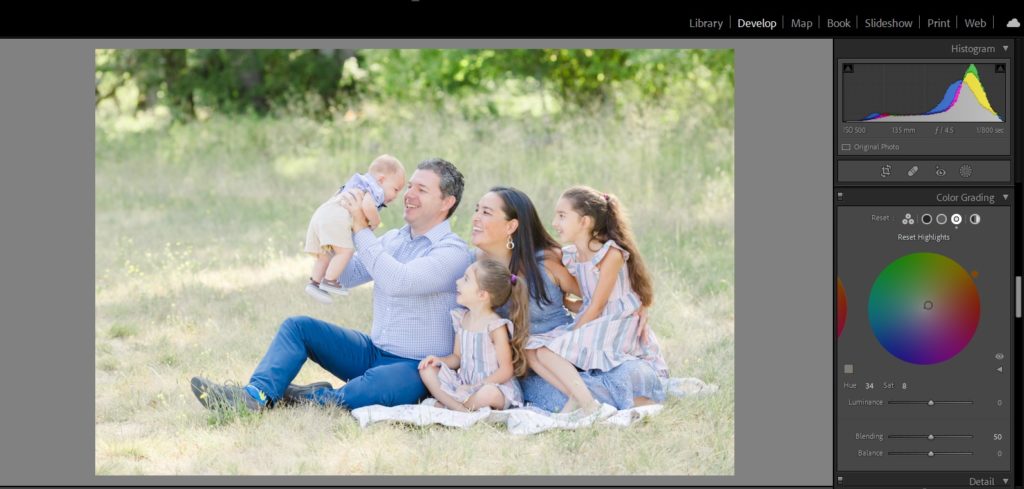
How to Edit Light and Airy Photos
These are the general guidelines I follow as I edit light and airy photos in lightroom:
- In the basic panel, bring the highlight slider down and the black slider up. This will soften the contrast and bring up the shadows without feeling overexposed. Light and airy photos shot digitally often mimic film, and film handles highlights beautifully without blowing them out.
- In the tonal curve, add contrast by pulling the dark slider down.
- Manage green tones in the HSL slider. Light and airy photography has a bad rap for totally desaturating all greens, but I like to aim for just pulling some of the neon yellow out of greens. To do this, I’ll bump the yellow hue slider just slightly to the green side, bump the yellow luminance up a touch, and bring the yellow saturation down a bit. I’ll do something similar to the greens, moving their hue just slightly to the blue side if the greens in the photo are particularly yellow.
Looking for more detailed help with light and airy editing? I’ve created a 19-page Light & Airy Photo Editing Guide that details my exact editing process in Lightroom. I’ll take you behind the scenes with my camera and lens choices, the camera settings I chose, and the essential choices I made as I took the photo. After that, I give you the exact adjustments I made in Lightroom–along with what my system is for editing every photo is in Lightroom. Learn more about the Light and Airy Editing Guide here.
Light and Airy Editing Tutorial
Ready for a real-life example of light and airy editing in action? I’ve put together a quick tutorial of how to edit in a light and airy style. The tutorial comes with one little caveat, though: it helps to shoot in a specific way first. For example, if you have a heavily contrasted image with lots of shadows and your subjects are all wearing black, well, it’s going to be difficult to just edit it and make it feel light and airy. The light, location, wardrobe choices…it all has to reflect that light, airy style. If you’ve followed the advice in the rest of this post though: you’re ready for these three light and airy editing tips!
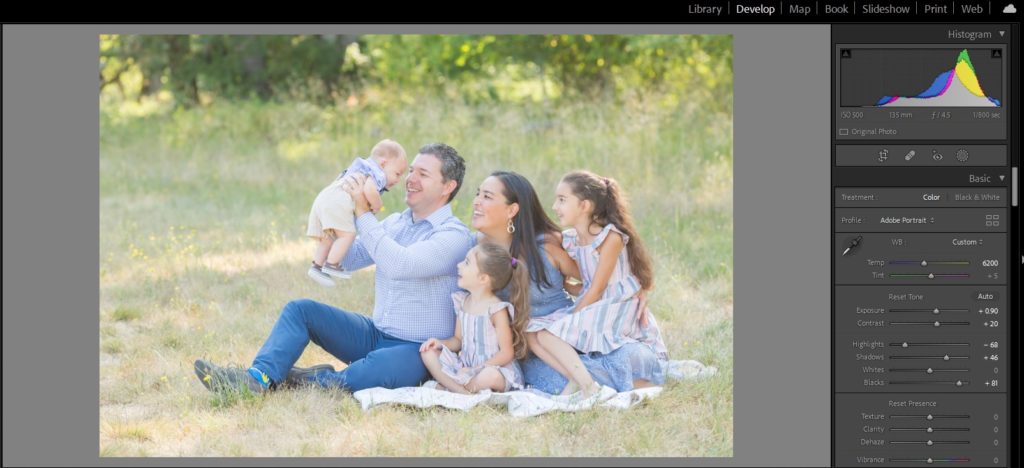
My straight out of camera RAW image for this tutorial:

This was from a late-summer family session last year in a meadow near my home in Oregon. The session was later published in The Kindred Path, a journal of motherhood photographers. Many of their published photographers shoot in a light and airy style if you’re looking to discover more favorite photographers! Now on to the tips:
Light and airy editing tip #1:
Flatten out your image by bringing the dark tones up and the highlights down.
Keep the black slider high, and the shadows slider just a little lower. Keep an eye on your highlights and pull the highlights slider down as needed to retain detail in any white/bright areas of your image, particularly skin and clothing.
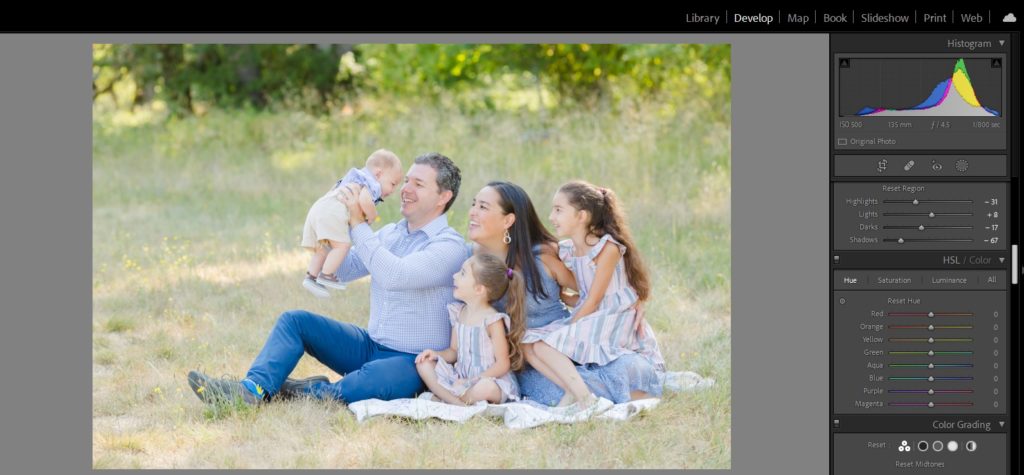
Light and airy editing tip #2:
Add contrast and depth to your image in the tonal curve.
Scroll down, and bring back depth to your photo by pulling down on the shadow slider in the tonal curve. If it feels like the skin needs a little glow, bump up the light slider in the tonal curve. I often bring the highlights slider down a touch here to avoid overexposing skin.
Light and airy editing tip #3:
Use the HSL sliders to manage warm tones, then add warmth to the skin with Color Grading if needed.
And that’s really it! There’s a little more tweaking here and there that I might do to get the color and tone juuuuuust right (I did warm the overall white balance up some more here), depending on the individual image. This particular photo was taken in the morning, with a ton of available light behind me, so there weren’t too many issues to deal with. Here’s what my final image looked like today:
Looking for more examples of exactly what a light and airy edit looks like in Lightroom? Check out my Light and Airy Editing Guide here.
Light and Airy Presets
If you’re looking to speed up your workflow, you might be considering some light and airy presets. While no preset is a one-click fix-all, they can absolutely create consistency in your work and make your workflow go more quickly. If you have done the work to create photos that are close to what you want in-camera by following the steps in this post, a light and airy preset can be a great tool to have. These are a few of my favorite light and airy presets:
- Refined Co.
- Katelyn James Preset Process
- The Archetype Process Green Pack
- Mastin Fuji Preset
- Noble
- Kindred Presets
Next Steps to Create Light and Airy Photography
I hope this article was helpful to you as you refine your art and explore the light and airy photography style. To help you on your photography journey, I’ve put together a few resources that might be helpful in creating your next session.
What to Wear for Light and Airy Spring Photos
You can find more photography resources and tools here, collected from over a decade of my experience as a photographer. I’m so excited to grow this resource library for you, so please let me know if there’s anything in particular you’d like to see there!
How to Prepare for a Photoshoot for New Photographers
If this was helpful, let me know in the comments & then save it for later by pinning the image below!
PS, this week I’m sharing another work by a favorite photographer of mine–this time Stephanie Honikel, a Northern VA baby photographer. She shared this post about in-home newborn sessions that I just loved!


[…] shared my three favorite editing tips to create light and airy family photos on my blog here! Head over there if you’re struggling to achieve the light and airy look in […]
[…] the contrast and lightening any shadows to get the photo to light, soft, and warm. My “how to edit light and airy tutorial” goes into my three key tips to editing light and airy photos, and those are all tips […]
[…] P.S. I love connecting people to other photographers around the world. Please check out my friend Samantha’s most recent post about light and airy photography. […]
So glad I found this page! The light and airy images are so hard to do! You broke this down so good.
Great advice for those who are interested in the bright and airy photography style. While I’ve seen photographers whose images feel too “washed out” for my liking, I do enjoy seeing your work!
Wow, great tips! I absolutely love your style. You are light and airy but there is something very “Samantha Shannon” about your work too. SO beautiful!!!
Thanks for sharing you are the best! 👍
Could you share how to create a fine art family photography if you don’t mind!
Sooo helpful!! I really appreciate the way you explain and show everything – thanks again
I’m so glad it was helpful, Stephanie!
Thanks for this! I used to photograph weddings (2010-2018). I’m shooting a small wedding this evening and wanted a little refresher on the style I find myself gravitating towards. Super simple and super helpful.
I’m so glad it was helpful for you, Mikka! I hope the wedding went well for you!
Wonderful post! The light and airy photography style creates such beautiful, dreamy family portraits. Your tips make it easy to understand how to achieve that soft, glowing effect. Thanks for sharing this helpful guide!
I’m so glad you found it helpful, Monira! Thanks for commenting.